


On This Page: [hide]
What Is Web Hosting for VPN
Web hosting for VPN refers to the provision of hosting services specifically designed to support virtual private networks (VPNs). A VPN allows users to establish a secure and encrypted connection over the internet, enabling them to access private networks and browse the web anonymously.
When it comes to web hosting for VPN, it typically involves hosting providers offering servers that are optimized for VPN usage. These servers are configured to handle the specific requirements of VPN protocols, ensuring reliable and secure connectivity for VPN users.
![Web Hosting for VPN - How to Make Your Own Server [Guide]](https://cdn.hth.guide/wp-content/uploads/2023/07/Web-Hosting-for-VPN-How-to-Make-Your-Own-Server-1024x576.jpg)
What are The Main Benefits of Web Hosting for VPN?
Web hosting for VPN offers several benefits that cater specifically to the needs of VPN users. Here are some of the main advantages:
First of all, setting up web hosting for VPN provides a secure environment for transmitting data over the internet. By encrypting the connection between the VPN client and the hosting server, web hosting for VPN ensures that sensitive information, such as login credentials, personal data, and browsing activities, remain protected from potential threats and unauthorized access.
With web hosting for VPN, users can browse the internet anonymously. The hosting server acts as an intermediary, masking the user’s IP address and location. This helps to maintain privacy and prevents websites, advertisers, and other entities from tracking or profiling user activities online.
Another key benefit of using your own VPN is the benefit of allowing users to bypass geographical restrictions and access content that may be blocked or limited in their location. By connecting to a VPN server hosted in a different region or country, the users of the service can overcome censorship or content limitations and enjoy unrestricted access to websites, streaming services, and other online resources.
Web hosting for VPN enables you to have a secure remote access to private networks. Users can connect to their organization’s network or access sensitive information remotely without compromising security. This is particularly beneficial for remote workers, business travelers, or individuals who require secure access to corporate resources from any location. So if you have a company abroad, this is quite a good idea indeed.
VPN helps protect sensitive data transmitted over public networks, such as Wi-Fi “hotspots”. By encrypting the data between the user’s device and the hosting server, VPN mitigates the risk of data interception, ensuring that confidential information remains secure and inaccessible to potential eavesdroppers or hackers. And all of this is available to be configured as the one who manages it desires when getting the web hosting for VPN service.
Another key benefit is that web hosting providers for VPN often maintain a network of high-performance servers distributed across multiple locations. This helps to ensure fast and reliable VPN connections with minimal latency. Users can enjoy seamless and uninterrupted access to the internet without experiencing significant slowdowns or interruptions in their browsing or online activities.
What Is The Downside?
While web hosting for VPN offers numerous benefits, there are also some potential downsides to consider. These include:
Using a VPN hosted on a remote server can introduce additional latency and affect internet connection speeds. The encryption and routing processes involved in VPN connections may result in slower data transfer rates compared to a direct internet connection. The impact on performance can vary depending on the hosting provider, server location, and the user’s proximity to the server.
When using web hosting for VPN, you are reliant on the hosting provider for the security and privacy of your VPN connection. It’s crucial to choose a reputable and trustworthy hosting provider that prioritizes security and respects user privacy. Failure to do so could expose your data to potential vulnerabilities or unauthorized access. So do your research well before using such a service.
With web hosting for VPN, you have limited control over the server environment and configuration. You are dependent on the hosting provider’s infrastructure and settings, which may not align perfectly with your specific requirements or preferences. This limitation can restrict customization options and hinder certain advanced features or optimizations.
It’s essential to thoroughly research and choose a reliable and trustworthy hosting provider. Some hosting providers may log user activity, compromise user privacy, or engage in unethical practices. It’s crucial to select a hosting provider with a strong reputation for privacy, security, and transparency to ensure the integrity of your VPN connection.
The legality of VPN usage can vary from country to country. Some regions have strict regulations regarding VPN usage, while others may outright ban or restrict VPN services. It’s important to familiarize yourself with the legal landscape in your jurisdiction and ensure compliance with local laws when using a VPN hosted on a specific server.
Web hosting for VPN may involve additional costs beyond the standard VPN subscription fee. Hosting providers may charge separate fees for the hosting service or require a higher-priced plan for VPN-specific hosting. The cost of web hosting for VPN should be taken into account when considering the overall expenses of using a VPN service.
While these downsides exist, many users find that the benefits of web hosting for VPN outweigh the potential drawbacks. It’s important to assess your specific needs, evaluate the hosting provider’s reputation and capabilities, and make an informed decision based on your requirements for security, privacy, and performance.
What To Know Before You Create Your Own VPN?
Before you engage in creating your own VPN service, there are some very important facts that you will will need to be aware of.
1. Know your purpose and the goal of why you are doing this. Are you primarily seeking to enhance privacy, access geo-restricted content, or secure your network connections? Clarifying your goals will help you make informed decisions throughout the setup process. Or you want to make your company more secure.
2. Select the type of VPN protocol you will use. Research different VPN protocols to understand their strengths, weaknesses, encryption and compatibility with your devices and operating systems. Each protocol has its own features, security levels, and ease of configuration.
3. Choose a physical or a virtual machine for your VPN server. Consider factors such as computing power, storage capacity, and network bandwidth to ensure optimal performance. You can choose to host the server on a cloud hosting plan or another plan that suits you better, if the web hosting company offers it.
4. Make sure to build a secure VPN connection. Use the latest and most proven security measures to protect your VPN connections. This includes configuring strong encryption algorithms, secure authentication methods, and regularly updating your VPN server and client software. Additionally, ensure that your server and network are protected against unauthorized access and potential vulnerabilities.
5. Determine how IP addresses will be assigned to VPN clients. You can choose between dynamic IP assignment, where clients receive a new IP address each time they connect, or static IP assignment, where specific IP addresses are assigned to individual clients.
6. Do not forget to test out your infrastructure. Assess your network infrastructure to ensure that it can handle VPN traffic and provide sufficient bandwidth for a smooth user experience. Consider factors such as routers, firewalls, and network address translation (NAT) configurations to facilitate VPN connectivity.
7. Pay attention to user security. Use strong authentication mechanisms for VPN users, which will prevent problems, like a VPN leak occurring, for example. This may involve using username and password combinations, digital certificates, two-factor authentication, or integration with existing user management systems.
8. Determine your logging policy for VPN connections. Decide whether you will log user activities or maintain logs solely for troubleshooting purposes. Consider privacy implications and legal requirements in your jurisdiction.
9. Configure client devices to connect to your VPN server. This may involve installing VPN client software, configuring network settings, and importing necessary certificates or credentials.
10. Make sure the users are educated. Provide clear instructions to VPN users on how to connect to and use your VPN securely. Teach them on best practices for protecting their privacy, such as avoiding insecure Wi-Fi networks and practicing good password hygiene.
How to Create Your Own VPN using Web Hosting?
Below, we have created a guide on how to create your own VPN service using the OpenVPN protocol. Of course, you are free to research other protocols as well, since there are tons of different methods to go for. But for this guide, we will use this specific protocol and Google’s cloud service along with few lines of code and explanation. Let’s begin!
Step 1: Decide which cloud web hosting platform you are going to use. What you most likely will need is a virtual private server (VPS). Google Cloud Platform is recommended in this guide due to its beginner-friendly features and $300 free trial credit for new customers. However, AWS, Azure, and many other providers can also be used.
Sign up for the chosen platform and claim any available credits. For Google Cloud Platform, a valid credit card is required for verification purposes, but you won’t be charged.
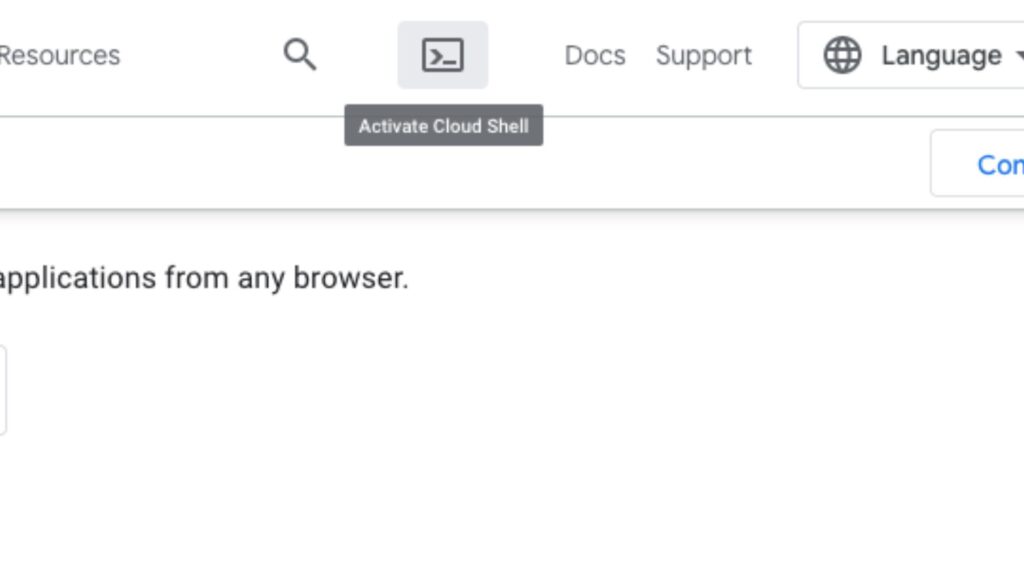
Access Google Cloud Shell located in the upper-right corner of Cloud Console. This will serve as your remote environment for setting up your virtual machine.
1. Go to Google Cloud Platform.
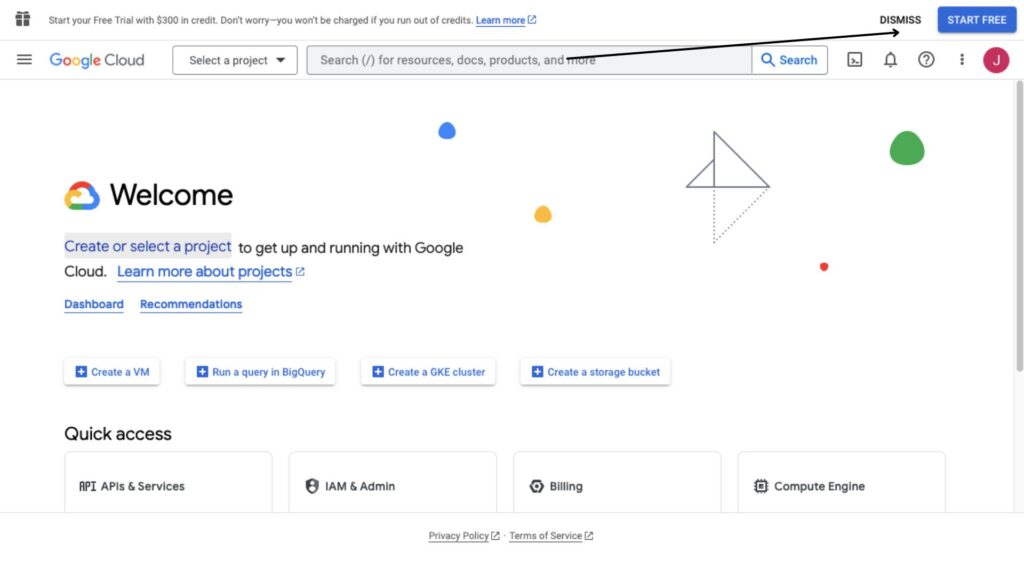
2. Click on “START FREE” and complete the process with your credit card to activate the free trial.
3. After its done, click on the Google Cloud Shell button to activate it. It should look like the image below shows:
Step 2: Download and run Algo.
For this step, follow the sub steps below:
1. In the Google Cloud Shell, type the following command and press Enter:
“git clone” https://github.com/trailofbits/algo.git
2. Type the cd algo command in order to change any directories where Algo might be open.
Algo is a VPN suite, which contains setup tools, that will make it easier for you to create the service.
Step 3: Create a new project and a service account.
For this step, you will need to follow the following instructions:
Paste the following commands one by one in your shell:
PROJECT_ID=${USER}-algo-vpn
BILLING_ID=”$(gcloud beta billing accounts list –format=”value(ACCOUNT_ID)”)”
gcloud projects create ${PROJECT_ID} –name algo-vpn –set-as-default
gcloud beta billing projects link ${PROJECT_ID} –billing-account ${BILLING_ID}
gcloud iam service-accounts create algo-vpn –display-name “Algo VPN”
gcloud iam service-accounts keys create configs/gce.json \
–iam-account algo-vpn@${PROJECT_ID}.iam.gserviceaccount.com
gcloud projects add-iam-policy-binding ${PROJECT_ID} \
–member serviceAccount:algo-vpn@${PROJECT_ID}.iam.gserviceaccount.com \
–role roles/compute.admin
gcloud projects add-iam-policy-binding ${PROJECT_ID} \
–member serviceAccount:algo-vpn@${PROJECT_ID}.iam.gserviceaccount.com \
–role roles/iam.serviceAccountUser
gcloud services enable compute.googleapis.com
Source: Cybernews.com
Step 4: Install the Python tool, which is required to set up Algo.
1. Use the following command:
sudo apt install -y –no-install-recommends python3-virtualenv
2. Then, use the following commands in your shell:
python3 -m virtualenv –python=”$(command -v python3)” .env && source .env/bin/activate && python3 -m pip install -U pip virtualenv && python3 -m pip install -r requirements.txt
This will install other Algo dependencies.
Step 5: Edit Algo’s configuration.
Now you should use the nano text editor (or another if you know how to use it better) by typing the command:
nano config.cfg
This opens the configuration of Algo.
IMPORTANT!!! When creating user accounts, be very careful. You should create specific accounts that you have already decided will be there, since you will not get the chance to do it afterwards when the server is already up and running.
– If you receive a question, asking you “Do you want to retain the keys (PKI)?”, select yes if you want to add more users later.
Save and exit and confirm the configuration by typing Y when it asks you if you want to save.
Step 6: Do the final configurations.
1. Start your Algo setup wizard by typing the following command:
./algo -e “provider=gce” “gce_credentials_file=$(pwd)/configs/gce.json
2. Make sure to choose a name for your VPN server. The default should be set to Algo.
3. Select whether or not you will use a “Connect on Demand” service which is basically similar to a VPN kill switch. This is a feature which allows Mac and iOS users to automatically activate the VPN service every-time they are online. The default option for this service is disabled, so if you enable it, remember, that you need to enable it twice – once for Wi-Fi connectivity and another time for mobile networking (5G, etc.)
4. Make a decision if you want to include users later. Select Yes if you will add users later. Select No for better security (you will not be able to add more users never again for this VPN, which lowers the risk of the server being hacked).
5. Choose an ad blocking service with your VPN. This is very suitable as it improves security and focus.
6. In case you will not use the SSH protocol for your VPN authorization, choose No when it asks you next.
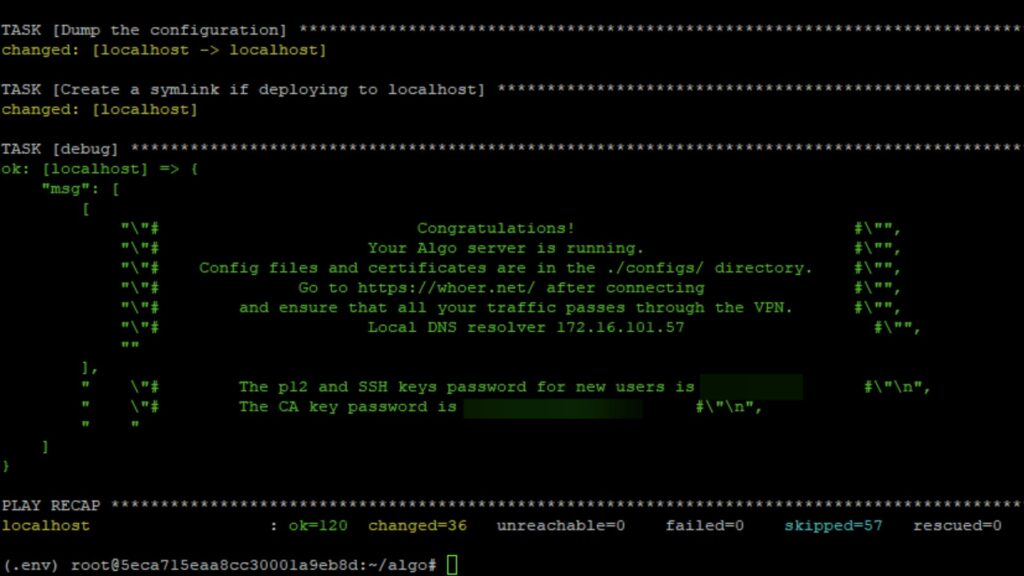
7. Now comes the cool part! Choose the region and location where your VPN sever will be hosted.
And the final part is to be patient and wait for the configuration to complete. When everything has finished, you have just created your personally dedicated VPN connectivity. Have fun!
Summary on Web Hosting for VPN
Web hosting for VPN offers several benefits, including increased control over privacy and security, the ability to bypass geo-restrictions using geo-spoofing, and secure network connections. However, there are downsides to consider, such as potential limitations on server resources and the need for technical expertise to set up and maintain the VPN server.
When creating your own VPN, it’s important to clarify your goals, research VPN protocols, ensure robust security measures, consider network infrastructure, implement strong user authentication, and test the setup thoroughly. Additionally, user education on best practices and privacy protection is crucial. Choosing a suitable cloud platform and utilizing resources like Google Cloud Platform can simplify the process.