


On This Page: [hide]
Creating a Blog on WordPress
Launching a blog might appear daunting, especially if you lack experience in the field. However, it’s not as complex as it may seem.
Platforms such as WordPress simplify the process, eliminating the need for coding or building a website from the ground up.
All that’s required is to familiarize yourself with WordPress to establish your blog. This informative article is here to assist you on this journey. So, take a moment to relax and carefully review the following steps.
Despite the numerous content management systems (CMSs) available, we highly recommend WordPress. It stands as the most popular and widely embraced platform.
According to statistics, WordPress CMS powers an impressive 62.7% of all websites with known CMS, equivalent to 35.9% of all websites on the internet. Notably, WordPress version 5 leads the way, employed by 72.5% of all websites using this platform.
The historical data indicates a consistent upward trend in CMS adoption, with WordPress surpassing competitors like Joomla and Drupal in terms of website usage.
This decision also carries significant weight, shaping your future blogging experience.
Should You Go with WordPress.com or WordPress.org?
What is the difference between WordPress.com and WordPress.org?
The WP CMS platform is one of the most popular software platforms for building blogs and websites.
Being free and open-source makes it easy for both experienced and inexperienced bloggers to modify it according to their needs.
The core software package is available to anyone at WordPress.org, and can also be installed as part of a package from a Web hosting provider.
WordPress.com also supports the core software. A company called Automattic, created by one of the founders of WordPress made the.COM domain for hosting WP-based websites.
Remember that if you go with .com, you won’t have to install the software as it is already included.
If the end result is the same, you might ask “Why would it matter which of the two I choose”?
The answer is that it matters A LOT because it will define the control you have over your site or blog. Our advice is that you go for the self-hosted WordPress.org platform because it gives you all the freedom you need.
Note that having a self-hosted website is just like owning your own home. Self-hosting a site means you have access to all files related to a website. The advantage is that you can do it any time, any way you see fit.
A self-hosted website has its own domain name and is hosted by a provider that has a specific space reserved for such self-hosted sites.
You can customize your site at any time.
Long story short, WordPress.com is a prime example of a hosted platform that runs on the aforementioned WordPress software, but WordPress.org offers a WordPress site package available for download so you can run it on a self-hosting site.
WordPress.com and WordPress.org Features
If you want a quick setup that works, requires next to no maintenance, and is easy to configure, you should choose WordPress.com.
On the other hand, if you want the freedom of choice, deeper customization, better Analytics, and to tinker with the site more, then you should definitely stick with WordPress.org.
Hopefully, this post has been informative enough for you to be able to make a simpler decision on which one to go with.
Either way, WordPress is so popular and big that whatever of the two platforms you choose with, you still have options to make every site you take up, in your truly own colors.
You can learn more about both versions of WP in our dedicated article WordPress.com Vs .org.
Choose the Right Domain Name
Choosing a domain name for your first site can be both entertaining and challenging. Since this is going to be the name by which you will be known and discovered online, you need to choose carefully.
In fact, the domain name of your website can be country- or niche-specific. Whatever you do, you should think Brand awareness and an SEO-friendly way.
Depending on your overall strategy, you can go for a brandable domain. As explained by Novanym, “brandable domain names are web addresses which have been created and registered but are not yet used as company websites.
These domain names have been designed with distinctiveness, catchiness, and imagination in mind, ready to be adopted by a suitable brand. Most crucially, it already exists, even though its namesake business doesn’t.”
Choose Your Web Hosting Provider
If the blog you’re starting is tied to a local business, then you should definitely consider the best hosting option for that specific market.
In other words, the very first thing you should know is that depending on whether you’re starting a local or international website, there are different approaches to consider and implement.
The first tip is quite logical: look for a server or a data center that is located in that specific country. Location is crucial when it comes to a local audience, as it ensures speed and reliability.
It could even improve the SEO of your website. You should also consider the local currency and legal regulations.
Each country has its specifics when it comes to laws and regulations, and you should get to know the ones in the country you are looking to grow your business and audience.
It is highly important to choose the best option in matters of value for money ratio, support, and additional perks for the customer.
After choosing your hosting provider, keep in touch, and seek all the assistance you’ll need – changing DNS settings, uploading and indexing your website, connecting an FTP program.
And keep in mind that the initial arrangement of your files is most likely included in the package you’re going to pay for.
Set Up Your Web Hosting and Domain Name
Shortly explained, a web hosting service allows people just like you to make their website accessible via the web.
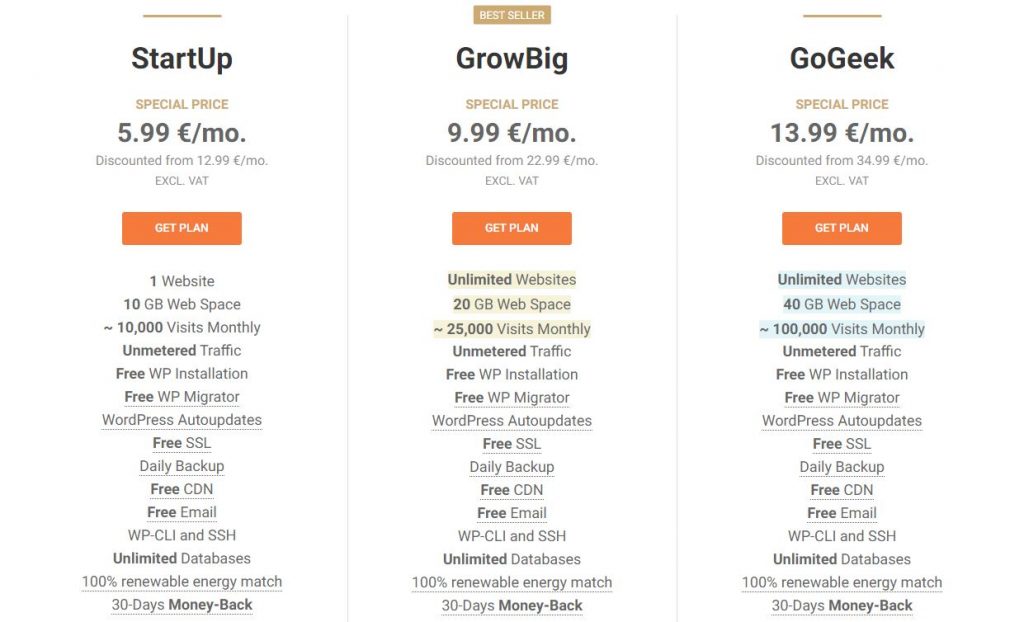
Our Editor’s choice for a new blogger web hosting is SiteGround, and you can get the fastest managed WordPress hosting at only $1.99/mo with free SSL, CDN, PHP 8, etc.
Note. We want to be sure that you know that the hosting links are affiliate and we get a small commission on every purchase with no additional cost for you.
Instead of that, you get the hosting at a special price with a free SSL certificate, CDN, and a 30-day money-back guarantee, so you can feel free to try the hosting for a month.
![]()
To start hosting your WordPress blog, go to SiteGround and choose your plan.
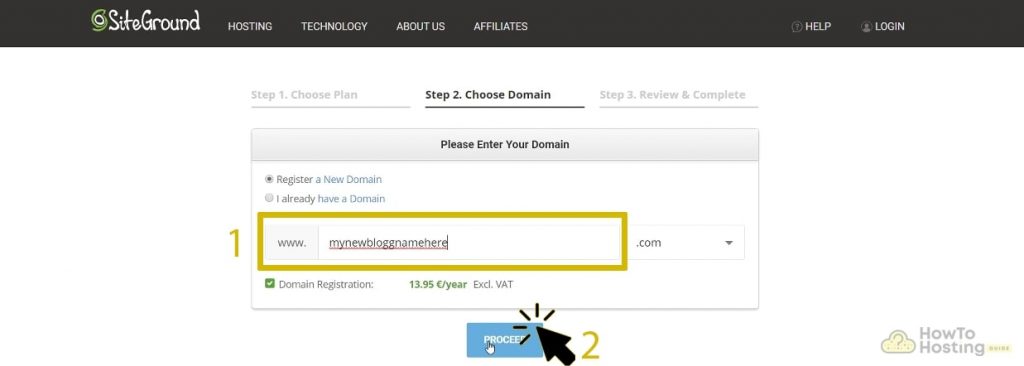
After choosing your hosting plan you need to type your website domain name.
Have a clear idea of the site’s domain name. For example, a good tip is to make it short and with focused keywords.
Then type in your account and client information in the appropriate fields.
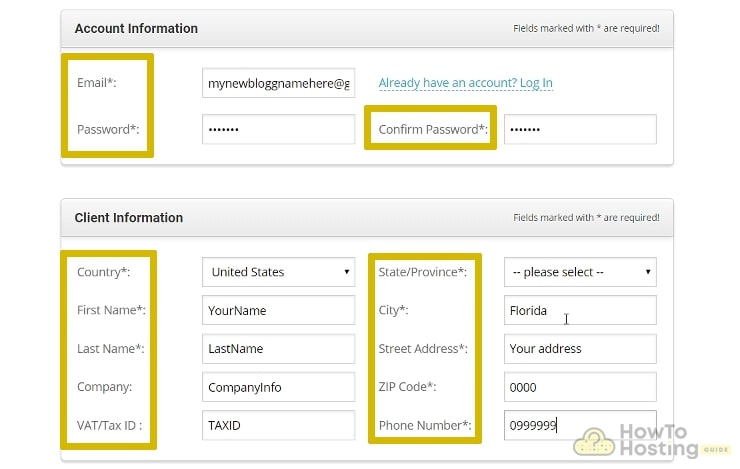
When you fill in your information, enter your purchase info like card number, PayPal, etc.
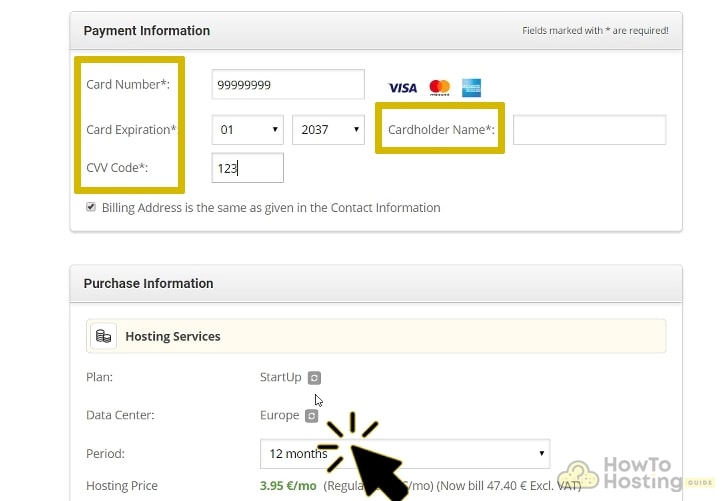
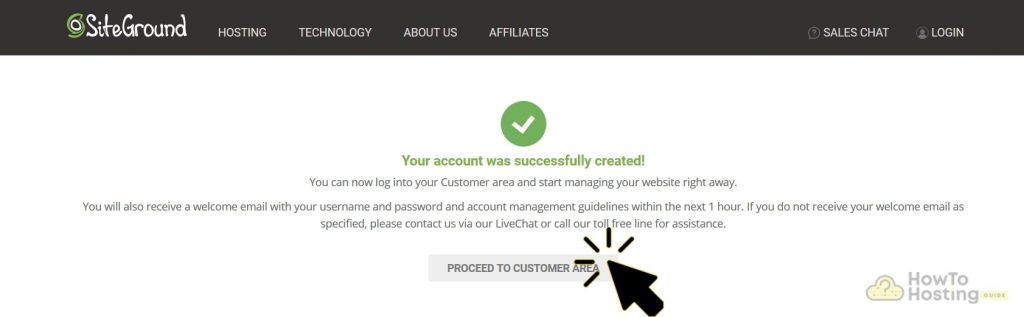
You have successfully completed the steps of purchasing SiteGround managed WordPress hosting.
Choose Your WP Theme
This step is about choosing your site’s design and layout. This step is as important as the rest. The layout of your site is its face, and you want it to be attractive, user-friendly, and intuitive.
You want your visitors to be happy, and the design of your website is key to this happiness. Of course, the information you will be providing is also a key element.
However, it’s not only important what you are saying but how you are saying it. You want your visitors to trust you and accept you, so be user-friendly.
Once you have installed the platform, start looking for the right theme for your blog. The theme should not only look awesome but it also should be practical, meeting your content needs and being consistent with your niche.
Before you select a theme, follow these tips:
- Carefully read the description which will give you a pretty good idea of the theme’s features and functionalities;
- Have a look at the theme’s ratings visible as starts in the preview and under theme details. Opinions (of other bloggers) matter;
- Preview the theme in a demo to see if it clicks with your content’s needs and overall idea;
Consider the theme’s responsiveness as a sign of your choice. A good theme has a responsive design that works on both desktop and mobile. This is also important for Google (and you want to please Google).
Should you go with a free, premium or custom theme?
This is an excellent question, indeed. The answer depends entirely on your blog’s needs… and your vision. Free themes come at no cost but it is highly likely they won’t meet your visions and expectations.
Premium themes, on the other hand, have a wide price range and a lot more to offer and are created by both developers and specialized showcase websites. You could invest in a single-use license starting from $30 up to $300 or higher.
Custom themes can be created by freelance developers or agencies. These themes require both coding and design knowledge. For the purpose of creating a custom theme, an existing theme could also be customized.
This is definitely an option worth your time, money, and effort, but it may not be the ideal one for a beginner. Your choice is entirely dependent on your budget.
How to Set WordPress on Your Hosting
Setting up WordPress on the SiteGround hosting is very easy to do. SiteGround has optimized its managed WordPress hosting for easy WP installation. That’s why we recommend using SiteGround on your website.
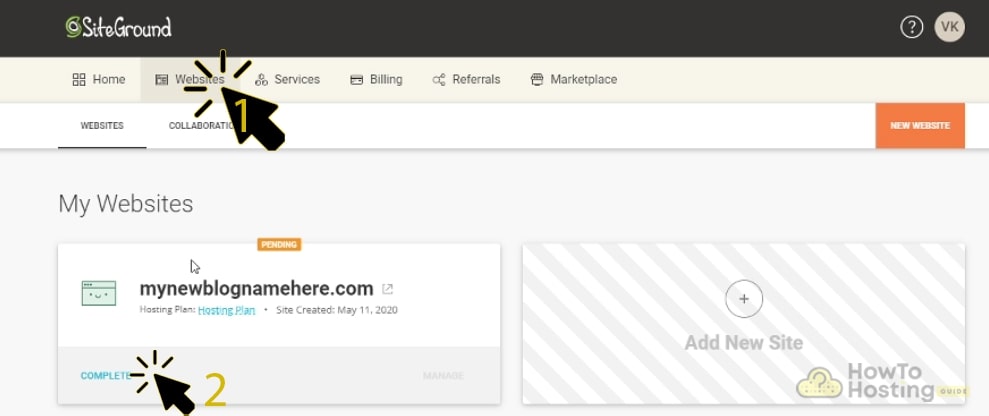
As an initial step goes to your SiteGround’s dashboard. Login to your account and then click on “Website”. Tap to the “Complete” button as shown below.
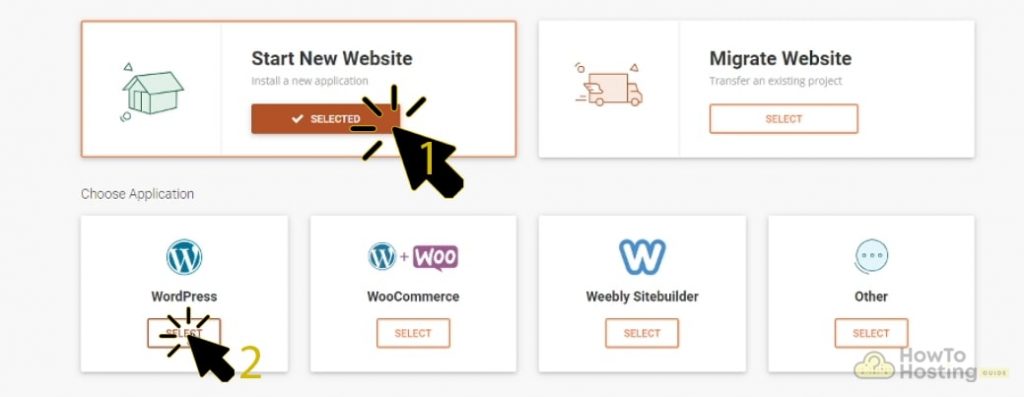
Select “Start a New Website” and choose WordPress if you are planning to create a blog. If you want to create an online store choose WordPress + WooCommerce.
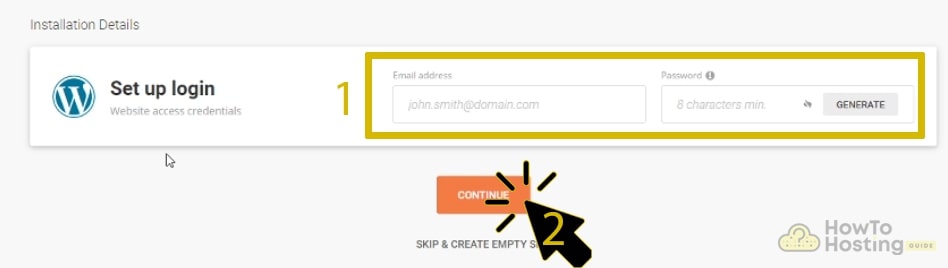
When you choose WordPress as your CMS platform, then you will need to create a new login for your website. When you are done click “Continue”.
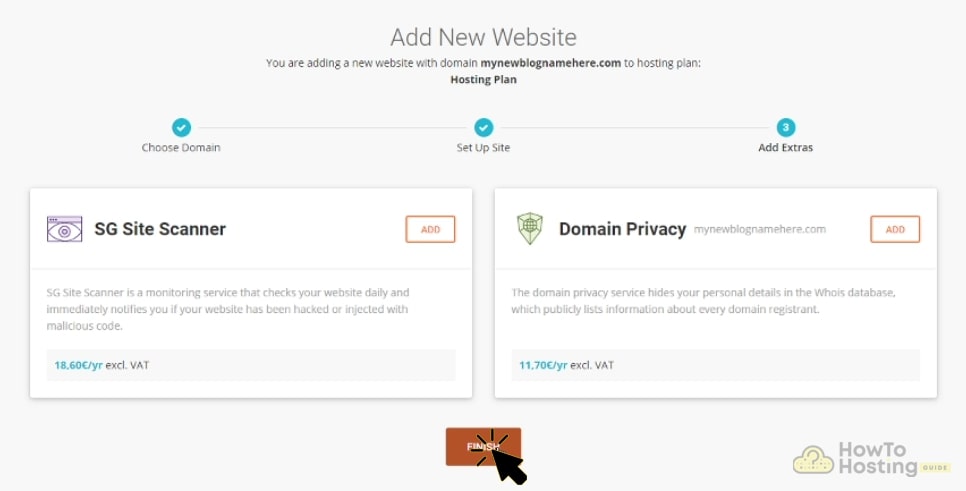
Here you can add some additional features when you are ready click “Finish”.
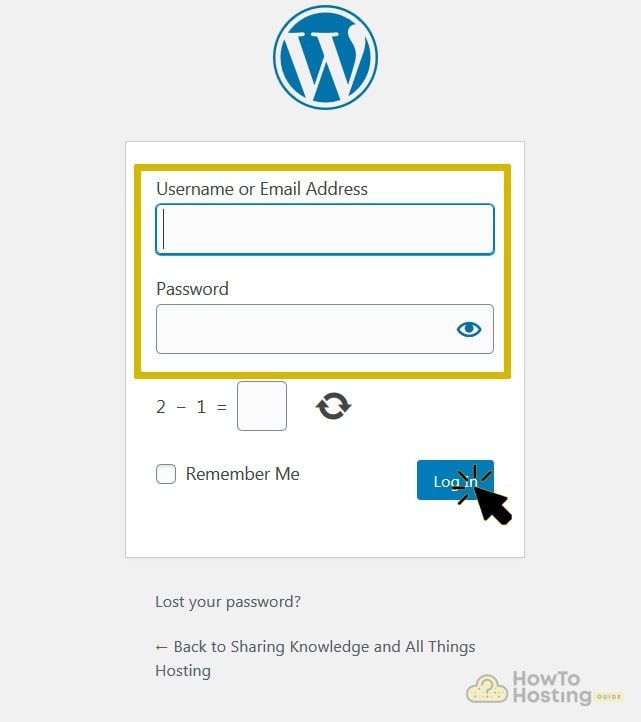
After you are already done with all these steps type “yoursitename.com/wp-admin/” in your browser and log-in using the WordPress e-mail and password you created earlier.
That’s it you are already on your WordPress website which is waiting to be customized. In the next step, you will find how to work with the WP editors, is it necessary to use a website builder.
Now, let’s move forward!
How to Install WordPress Plugins
After you are ready with the theme installation the next step is to add plugins to your WordPress blog.
It is really easy to add them. WordPress has thousands of free plugins and widgets about everything you want.
For example, you can add countdown plugins, timer plugins, contact forms, pop up plugins, and whatever shows up on your mind.
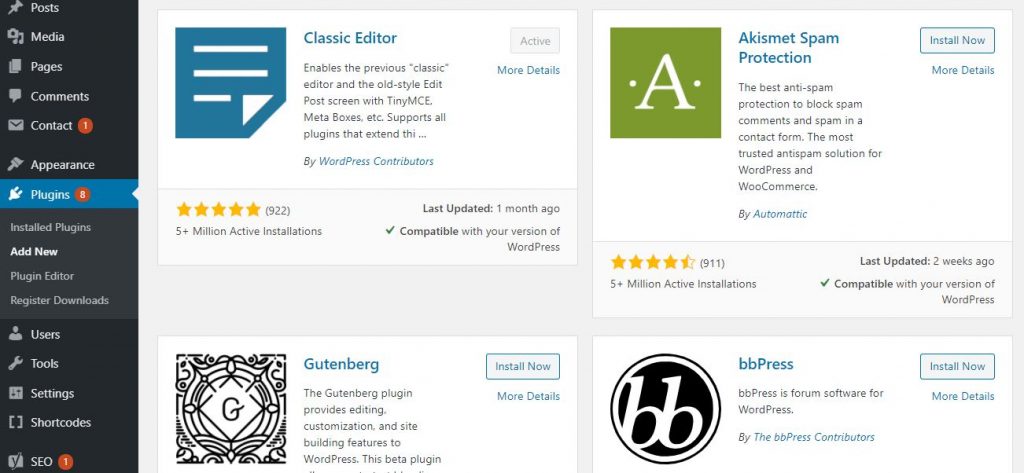
Adding a WordPress plugin to your blog is similar to the way we added the theme. Go to your WP dashboard “Plugins” “Add New” and search for the plugin you want.
Once you choose the plugin you want click “Install Now” and then activate it.
Configure the Best WordPress Blog Settings
Up to now, we have created our blog on a fundamental level. You know how to get a domain name, web hosting, install WordPress on your host, choose a theme, and install plugins.
Before we start with the page and post creation, there are some basic WordPress setting which we need to configure. Now let’s begin!
Configure Your Permalink Settings
The permalinks, also knowns as URLs are the web addresses of your website content. It is basically a code through which people can enter your website.
There is an option in the WordPress settings which allows you to choose the structure of your permalinks.
By default, WordPress set a “Plain” URL structure, which represents some kind of random numbers. This structure is the worst option that you can choose because it doesn’t tell the search engines anything about the URL’s content. In other words, it isn’t good for the SEO of your website.
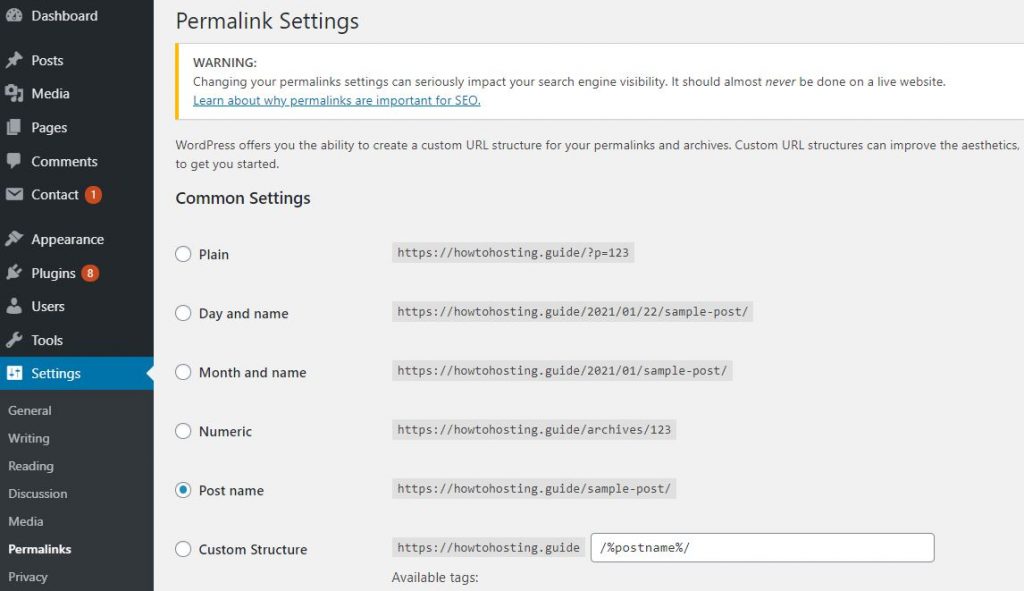
The best option you can choose is “Post Name” with it, the URL will be the same as the name of its content.
Search Engine Visibility
WordPress has an option for private websites or personal portfolios. This option simply discourages the search engines index your content.
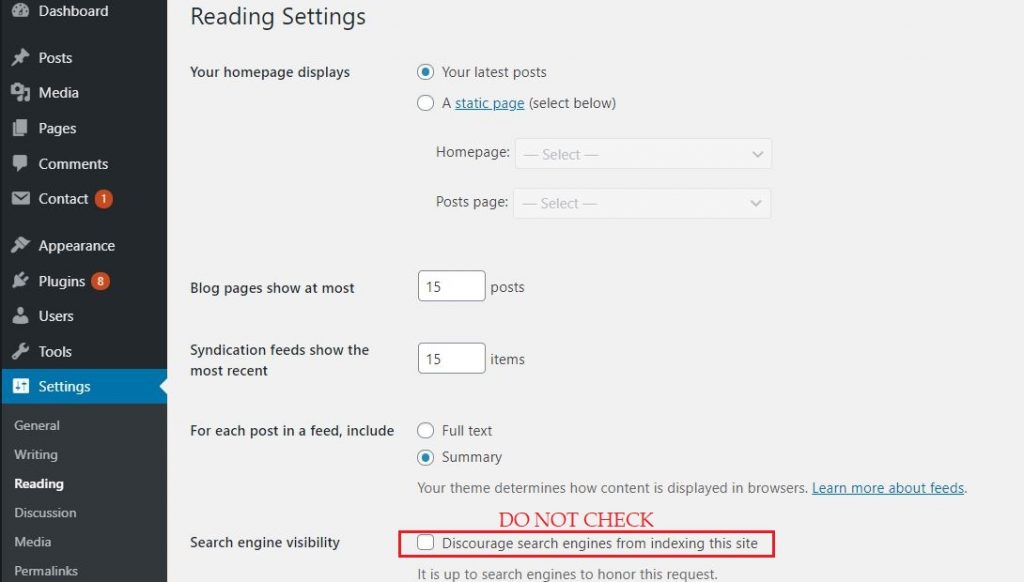
Make sure you never check this option instead, if you want to have a website for your own.
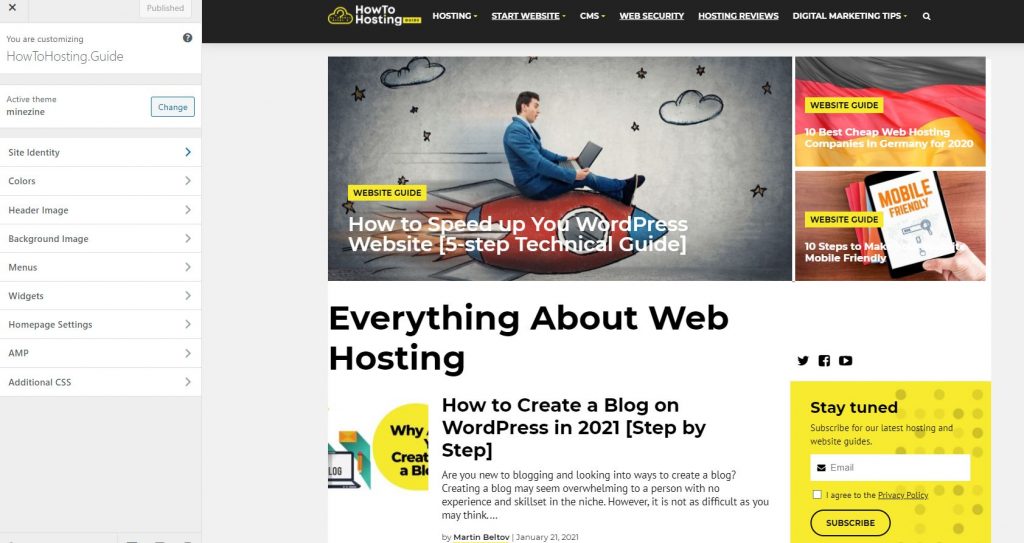
Customize Your HomePage
Having a well-customized homepage is very important for your website UX.
WordPress has made it easy by using their customizer.
Just go to Appearance –> Customize, and then experiment. Make sure that the default WP customizer has limited opportunities. The best way to get a stunning design of your website is by using a website builder.
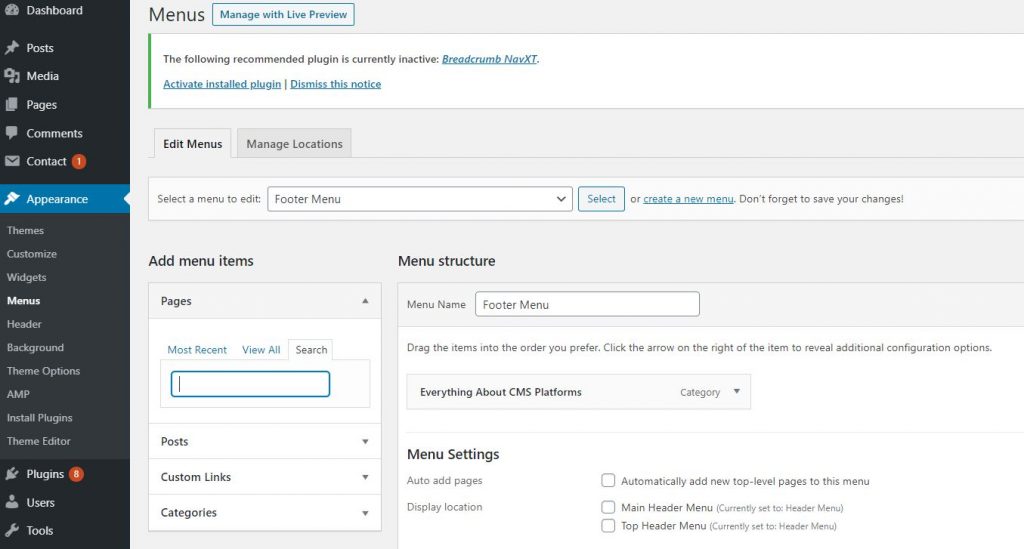
Create a Navigation Menu
Having a navigation menu on your wordpress website is another important feature which must have. It provides quick links to your website’s most important content, and it can be customized easily through your theme.
If you want to add a navigation menu, go to Appearance –> Menus –> Add a Menu.
Using the WordPress Editor to Create a Blog
WordPress is the most used CMS platform when it comes to website building. It offers lots of capabilities and opportunities, but it has one pretty significant downside.
The page editors that the platform provides are simple, but counting only on them will revoke the chance of creating a blog with various styles and layouts.
The classic WordPress editor has a word processor and allows you to add text, images, codes, and visual modes. You are not in the ability to create whatever you want.
Create Pages on Your WordPress Blog
When it comes to creating pages on WordPress, you have two different options.
If you have a blog and posting daily new or articles, you need to create a post. You need to create a page when you create landing pages, or pages like About us, Contacts, or Homepage, for example.
Unlike the pages, the posts can be organized into categories and tags.
Homepage
The homepage is a presentation of your website. It is the first thing which the customers of your website see when they visit it. It might be well customized and organized.
It is essential to have the most important stuff on your website. A user-friendly interface is also required for having a better user experience.
When you start up your WordPress blog, the platform automatically creates a default homepage with a pretty simple design that needs to be customized.
Before you start customizing your homepage, you need to consider a few things.
Choose a theme that supports homepage templates: It will save you a lot of time if you use a pre-made homepage supported by your WordPress Theme.
About Page
Creating and having an About page is a great way to familiarize your customers and website visitors with your activity.
You can describe what they can find on your website and provide some emotional content, for example, your history or, if you are an individual person, something about your life and how you have been inspired to start your enterprise.
The About page needs to look good and convince people that they are in the right place.
Contact Page
Having a contact page on your website is of great importance because it is when you receive the essential information about your visitors and make them customers.
The best way to create your contact page is to add a contact form where your clients can fill in their email and send you a message.
The best way to create a contact form is by using WPForms. You can use it to add any forms you need on your website.
Create Pages with Classic Editor (Blog Pages)
Creating a page with the classic WordPress editor is a pretty simple task that even a newbie can do.
First, go to your WordPress Dashboard, then Pages –> Add New.

After you are here, customize your page by adding title and content. You can also use the page attributes to create a link, bold text, add an image, etc.
If you are using a specific WordPress theme, you may have a custom template that will look differently.
After you are ready with the content creation, the last thing you need to do is to publish your work. You also have the option to preview it before posting it.
How to Write Your First Post
Writing and creating your first blog post are different things.
This step is dedicated to the more technical side of the post creation. Remember that you should have a clear idea of the topic you will cover before writing your blog post. Making it SEO-friendly is also crucial.
Create Your Post with the Classic WordPress Editor
Technically, creating a post with the classic editor on your WordPress blog can be done really easily if you have your content ready to be pasted on the white sheet.
First, go to your WP dashboard, then Posts –> Add New.
When you are at the “Create a Post” page, you can notice that it has pretty much the same layout as when we were creating our pages with the classic editor.
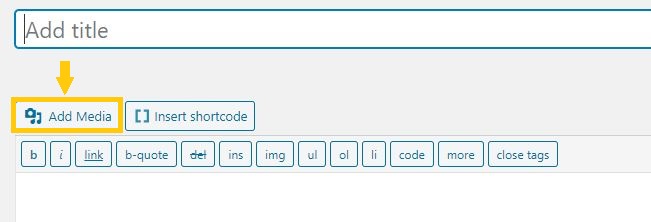
You need to add a title, and under the “Add Title” box, you have the bootstrap menu, through which you can access HTML codes in a faster way only by clicking the icons.
If you are ready with your content, you can paste it on the white sheet, customize the titles, and highlight the stuff you want.
Also, you can import images and videos by clicking on the “Add Media” icon. For best performance on your website, optimize your images.
Add Tags and Categories
Adding tags and categories to your WordPress blog is helps you organize your content.
Remember that categories are hierarchical structures that organize your content by relevance.
For example, you have a blog for healthy food and you write vegan recipes.
It will be relevant to add a category – “Vegan Recipes,” which can be a subcategory of “Healthy Recipes.” Also, in the main category, “Healthy Recipes,” you can add “Vegetarian Recipes” and “Low Gluten Recipes” as other subcategories.
You can add as many classes and categories as you want in order to hierarchize your website and create relevance within your content.
To add categories with the Classic Editor, you need to be on your post. On the right side of the screen, you will see the Categories box.
Click “Add New Category“, name it, and choose if you want it to be a parent category or a subcategory.
In the same way, you can add new tags or choose from the already created ones.
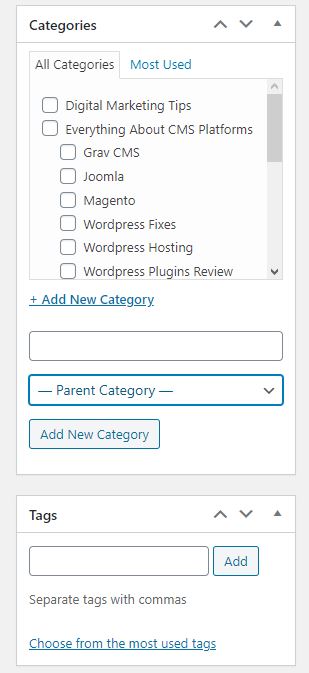
Tags are used for describing specific content. By adding them to your posts, you create relevance between the posts with the same tags, which means they have something in common.
Be careful with the tags because they can create a big mess on your website if you don’t use them properly. Do not overuse them.
To add categories and Tags with Gutenberg editor, go to your post page, and click on the “Gear” icon in the upper right to access the menu. Then add your categories and tags, in the same way, as with the classic editor.
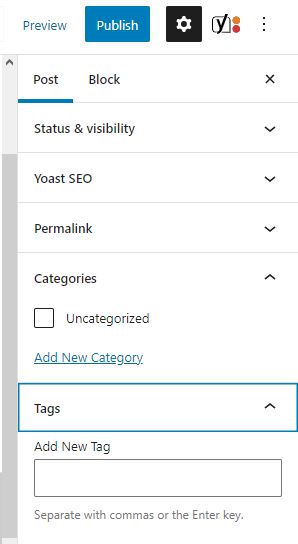
Once you are ready with your tags, categories, content, and customization, add your final touches and click on the “Publish” button to make your article visible on your website.
A good habit before publishing is to preview the whole work and remove any mistakes.
Create a Sitemap of Your Content
If you are not sure what is a sitemap, here it is:
A sitemap is a list of your website’s content, mostly containing their URL’s.
There are two types of sitemaps: HTML sitemap and XML sitemap.
HTML sitemap meaning: It is a list of all the important content pages of your website. Adding them to the HTML sitemap, you basically tell Google that this content powerful. The search engine refers to the database and indexes these pages faster and ranks them better.
XML sitemap meaning: Unlike the HTML one, the XML sitemap list all your website URLs acting like a connection between your website and the search engines.
By having an HTML and XML sitemap, the search engine crawlers can find, index, and rank your content a lot easier, so make sure you use them in your WordPress Blog.
Create a Table of Contents
Implementing a table of content is another good SEO technique, which Google loves. Putting your “H2” and “H3” titles in a similar table will give them the power to rank well as keywords in the search engine.
Use Alt Tags on Your Images
In simple words, alt tags are acting as a translator for Google. They describe the image’s meaning and what’s on it. Adding alt tags will help boost and optimize your images to rank well in the image search.
Create Your Content Strategy
Once you have completed the previous technical steps, it is time to provoke your inspiration and imagination! You have arrived at the destination, which will open new doors and possibilities for you and your blog.
As you can imagine, content strategy is an endless topic, and SEO experts have written entire books about it. There are, however, some necessary steps you should start with, such as:
- Defining your goals;
- Researching the niche (market), you will be targeting;
- Select the keywords you will be targeting; (Jump to Keyword Research);
- Researching the competition;
- Carefully choosing your topic ideas;
- Start working on your content and its elements.
Conclusive Thoughts on Creating Your WordPress Blog
Whether your blog is a digital diary, a creative portfolio, or a platform for thought leadership, WordPress offers the perfect backdrop for your narrative. Start your blogging journey today, and let your voice resonate across the vast expanse of the digital landscape. Your story is waiting to be told, and WordPress is your trusted companion in the journey of self-expression, exploration, and online impact. Happy blogging!
Thank you so much for this tutorial! I’m a newbie, and here I found all the essential details that will help me to start creating my personal blog the right way.
Good job guys, like it because it shows pure advice and suggestions without pushing products and services. I am using local hosting provider in Greece and found you trough your wordpress install review for Papaki.
Is there any way to create meeting on the home page on wordpress blog. I am using free theme. Please advice?
Hi there! Thanks so much for the tutorial. Can I ask you something in addition? Is there a way to create an email address that is linked to a blog? I don’t want my blog to be linked to a personal gmail account. So I need to create an email address dedicated to the blog. Thanks :)
Hi Howtohosting Team,
you have written so much content! So thank you, for starters.
I didn’t know where to begin from, but then I kept reading more and more and got the gist of it, i think. Good thing you have pictures and tutorial parts and that sort of stuff. I especially liked the DO NOT CLICK tip on the “Discourage search engines from indexing” part – I was laughing at how it was phrased, but wondered what exactly it would do – you made me check up on it.
You have made this like a type of encyclopedia of sorts, which I like, but to be honest, I haven’t followed everything… too long, lol, but can you give more examples on what quality content is, aside from how-to guides and news? Now, I have an almost fully working site, so that is my question – the bit about good content. What makes it good? Are backlinks that important and if I pay for such is a bad strategy?
Waiting for a response,
Your brand new fan,
Robert
Hey, Robert!
Glad we have been helpful!
To your points:
Quality content should be written with meaningful sentences, that best help your audience. For example, you are selling cars – do not write just the specs of the cars, but more detailed history about each vehicle.
What makes the content good is when you make it engaging. Make it, so that your users would definitely want and need to see that content on your site and that it helps them. So, it applies to any type of site, those above were just a few examples.
Backlinks, internal links and other useful information links are important, but do not pay for them. As a beginner, you have a lot to build and with a fast site and good content (see what I did there, haha), the links will come eventually.
Paying for links can be good and bad. If you pay someone to be on their page, that can be beneficial and ethical. But like paying for thousands of links to go to your website as a fake boost in a short period of time is bad and you should definitely not do it.
Best Regards from the HowToHosting.guide Team!
Yes, BenEC, you should create another email account for the blog.
You can always change the emails, so no worries there.
Is it really mandatory to use Email Outreach, will it help with regularly returning users?
There is something I’m wondering about.. is it possible to use wordpress just for a blog creation and then transfer the blog to my wix site? I’m just trying to find best option to combine wordpress and wix… thanks in advance!!
Thank you! Such an awesome article!
It is great that guides like these exist to help users to reach their goals and WordPress is definitely the platform I would use
I have just set a WP Website for my business. The next step is to add a SEO plugin. At first, I thought that Yoast will be the best choice but then the Rank Math tool which I saw in an article you linked – the best SEO tools, grabbed my attention. Now I try to identify which one will work better.
Danke! Great article which has helped me make my first blog site so easy!